|
|
||||||||||||||||||
Disaster RecoveryDR is best when you go with something that you know will work, and you know it works because you routinely use the same tools in your day to day operations. That's the idea behind dr.sh. It recovers databases just like the recovery scripts created by the backup.sh script, it optionally clones databases just like the clone_snap.sh and clone_mirror.sh scripts, and the dr.sh script is used to move a database from one host to another in order to avoid downtime due to host outages. If a host fails unexpectedly, it's not a problem. We start the database on any host with available resources and point the LDAP entry to the new host. Download: dr.sh There are standards and additional scripts that create the environment which the dr.sh script needs. The following diagram is an overview. The heart of the system are the NetApp filers. Each production oracle database has a self contained volume on a local filer which is named the same as the database, except databases are uppercase and volume names are lower case. Each of those production volumes then has a corresponding volume on one of the off-site DR filers which is the same name as the production volume except it has a prefix of "x". Why "x"? Because it's cool, and your less likely to offline/destroy a production volume when you meant to be destroying an off-site mirror. In addition to the production database volume mirrors, we also mirror two additional support volumes. The first support volume named "oracle_share". The oracle_share volume is mounted on every UNIX Oracle host and it contains database control file backups, parameter files, tnsnames.ora entries, crontab entries, NFS mount command, database utility scripts, and anything else we might need to know in order to not only recover the database, but to put it backing in good working order. On the DR host the mirror copy, "xoracle_share" will be mounted first and provide data for the dr.sh script to do the rest of it's work. The other is "standard_aix_u01" and it contains every Oracle that is deployed. Our production environment is configured such that each host is using a copy of this volume. This assures us that we can move a database from one host to another and the needed Oracle binaries will already be in place to support it. For DR is eliminates the need for the host to match production host. We take any host that is made available and create a /u01 volume for it using the mirrored "xstandard_aix_u01" volume. That gives us the flexibility of utilizing whatever resources are available at the DR site. If resources are initially limited we can fire up as many databases as possible to get the ball rolling and then move databases to other host as they become available. The dr.sh script will limit the about of memory allocated to 1 gig when it initially starts any database but the original pfile is available and only needs to be renamed in order restore the production memory footprint.
dr.sh testYou have the option of testing your DR process without committing to breaking the DR mirrors. Instead of breaking the mirror and starting a database using the mirror volume, you can run a "test" and the dr.sh script will instead create a clone of the database using the mirrored "x" volume. You can mess around with the clone for days without the "x" volume ever falling behind in it's snapmirror updates. When dr.sh runs in test mode the resulting volume name is "z" followed by the production volume name. The database name will also have the "Z" prefix unless it's production name is included in the "dr_use_prod_name.txt" file. The reason for the prefix is again to avoid confusion with the production database. The applications will not know the difference because the listener will automatically register the database and the dr.sh script adds SERVICE_NAMES=<Production DB name> to the parameter file so that a database named ZPROD will register with the listener as PROD. There are exceptions created by services or supporting scripts that require the database name to be the same as the production database name. For those exceptions, just add the production database name to the dr_use_prod_name.txt file and be careful about which database you are really connected to before you go and destroy things. dr.sh not_a_testAs the name implies, not_a_test is for the real thing, but the inappropriately named, "not_a_test" parameter can also be used for testing. The real difference between "test" and "not_a_test" is that you will not be able to keep the mirror volume updated during the test. Unlike "test" mode, it will not create a "Z" clone from the "x" volume. Instead it will break the mirror, mount the "x" mirror volume and create a database with an "X" prefix, unless the production database name is in the dr_use_prod_name.txt file. If the "X" prefix is used, the dr.sh script, like it does in "test" mode will modified the initialization parameter file with a SERVICE_NAME entry so the database registers with the listener using is normal production name. You can recover from a test after running "not_a_test" using another inappropriately named parameter "destroy". The destroy option will restore the previous volume name if it was changed and sync it back with the source using the existing snapshots. dr.sh destroyOnce you have the ability to clone a database from a snapshot in less than two minutes and not require any additional storage you will likely find yourself cloning for all kinds of reasons. Like finding deleted or modified records, tuning SQL, getting exports from consistent data using a non-production host, or giving the developers access to current production data to test changes in an emergency. The "destroy" option is only used in DR if you need to clean up after a test, but it is frequently used on the test and development host to clean up an ad-hoc clone created by the clone_snap.sh script. The "destroy" option will check to if the database is on one of the DR filers and if so it will only destroy the volume if it is "z" volume clone. If the volume is the "x" volume or was the "x" volume before it was renamed, then it will restore it to the "x" volume name, check for a common snapmirror snapshots with the source volume and proceed to start a resync if common snapshots still exists. When "destroy" is run on a Non-DR filer, it will simply prompt for confirmation and then shutdown the database, un-mount and destroy volume, remove any crontab entries, and delete all of the database configuration files. dr.sh move from here & dr.sh move to hereOnce you can quickly and easily move a database from one host to another you will find all kinds of reasons for doing so that have nothing to do with DR. Minimize maintenance time and impact by temporarily moving a database to a host with lots of resources. Balance load on among host. Or avoid a hardware maintenance window that would normally cause an database outage. The "move from here" and "move to here" options allow you to to do the work in a couple of minutes. The process relies on the same company standards exploited by the clone_snap.sh script to make an ad-hoc clone database from any snapshot. So the work needed to changes to a standard format for files pays off with the ability to automate much of your work. The video (dr_move_database) shows the process in use.
Creating DR MirrorsNetApp snapmirror feature provides an excellent method for moving your data to a secondary location in near real time. In the event of a primary filer outage all of your data will be readily available and include all of your snapshot backups so you can recover the database to any of those points without the need for archive logs. It's not difficult to configure a few mirrors for testing, but when it comes time to configure a mirror for each of you 120+ production databases it will help to use a couple of scripts. Download: dr_mirror_config.sh The first task is to map each production volume to one of the aggregates on one of the DR filers. The dr_mirror_config.sh script can then be used to create the volume on the DR filer. The company standard is to name the DR volume the same as the production volume but prefixed with the letter "x". The purpose of the prefix is to avoid accidentally removing a production volume when you intended to simply remove the mirror volume. The arguments to pass to the dr_mirror_config.sh script are; the database name, which by company standard is the same as the production volume, the name of the target filer, and the name of the aggregate on the target filer where the DR volume is to be created. You can list the available aggregates on a filer with the "df -Ag" command. By standard each NetApp filer is assigned a number and the script's directory which contains the dr_mirror_config.sh script also contains one script for each filer that simply passes commands to the filer via a remote shell call. For example, the N10, DR filer has a script named n10.sh with the contents: "rsh N10 -l oracle:password $*" In order to list the available aggregates on the N10 filer the command is: "n10.sh df -Ag" as show in the following example. Once an aggregate is selected the dr_mirror_config.sh command can be run. In the following example a DR mirror is created for the MAXS database on the N10 filer, in the "aggr_103" aggregate. The new volume is created slightly larger and the database's volume and it is set "restricted" as will be needed prior to initializing it as a snapmirror destination.
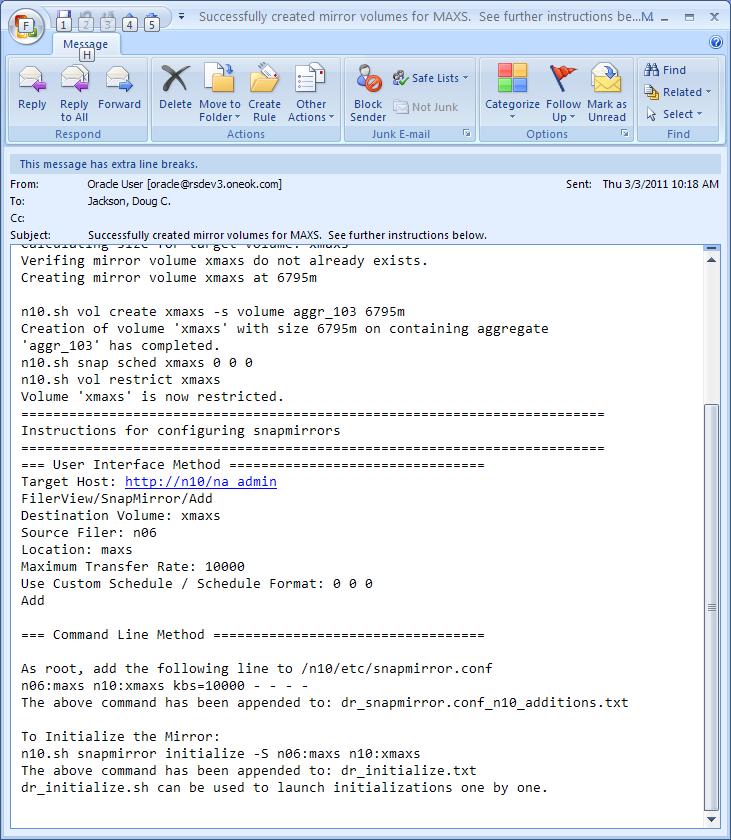
The dr_mirror_config.sh script sends an email to the members of EMAIL_LIST list which is configured in the script. That email contains the instructions for configuring the snapmirror.conf file on the destination filer:
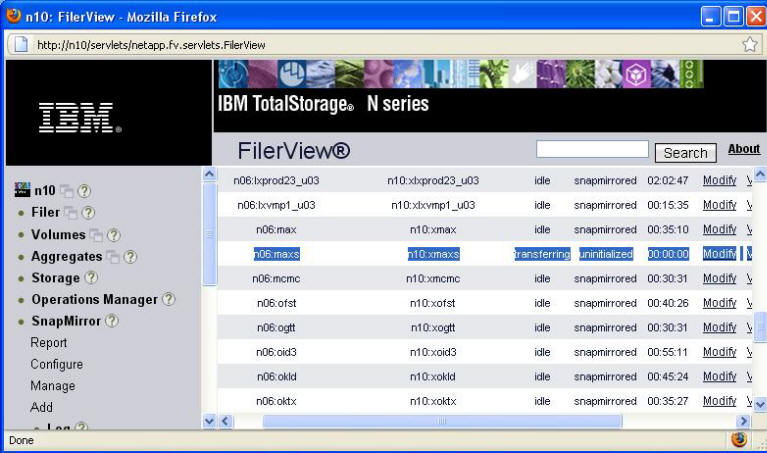
The required change to the snapmirror.conf file can be done thought the NetApp interface or by directly modifying the filer's /etc/snapmirror.conf file. If you are configuring only one snapmirror, you might just use the GUI interface:
If you are configuring more than a few mirror targets, then modifying the snapmirror.conf file is much faster. To do this you will need either mount the filer's root volume with read/write access or you can open the /"etc" directory under Windows explorer with it UNC path. For example, select Start/Run and enter: "\\n10\etc$". You will be prompted for credentials and connected the the N10 filer. Each time dr_mirror_config.sh is run, it also updates a file named dr_snapmirror.conf_<FILER>_additions.txt in the same directory as the dr_mirror_config.sh script. For the example above the file will be name: "dr_snapmirror.conf_n10_additions.txt". The file is appended with the configuration line that needs to be added to the snapmirror.conf file. So you can simply cut the lines from the dr_snapmirror.conf_<FILER>_additions.txt and append them to the appropriate filer's /etc/snapmirror.conf file. For example:
Snapmirror InitializeOnce the remote volume is created and the snapmirror.conf file is updated you are ready to begin seeding the remote mirrors. The initialization process necessitates that the entire volume is copied, not just the changes. When the dr_mirror_config.sh script ran it also appended a file named "dr_iinitalize.txt" with the command to start the initialization process:
You could start an initialization of all of the volumes at once but even with the transfer rate limited with "kbs=10000" doing this will likely swamp your connection to the remote site, your large databases will take a very long time to seed and require much more snapshot reserve space. Also if the connection fails during the initialization process you will likely need to start the initialization again from the beginning. Download dr_initialize.sh The dr_initialize.sh script will regulate the initialization of a batch of volumes by initializing only one mirror at at time and modifying the throttle to unlimited when you create a file named "dr_initialize_throttle_up.flag" in the same directory as the dr_initialize.sh script. You can still start a snapmirror initialization manually. Doing so will just cause the dr_initialize.sh script to wait before it starts a new initialization. By adding the dr_initialize.sh to your crontab you can decide when new initializations will start if none are already running. Once you have the lot of mirrors on the remote site you will need more bandwidth for updates and most of that traffic will most likely be during business hours, so it's a good idea to initialize your large volumes first and then schedule dr_initialize.sh to run every 10 minutes or so after business hours so it completes the rest of the initializations without causing undue lag in the snapmirror updates. Checking on the snapmirror's is done using the "snapmirror status" command. In the example below a snapmirror initialization is started for the xmaxs volume and the status is checked a couple of minutes later. By omitting the volume name the command will list off to the mirrors on the specific target filer.
Snapmirror UpdateKeeping the mirrors updated is done with by scheduling updates in the GUI or by running the "snapmirror update" command. The backup.sh script has the ability to run the "snapmirror update" command by simply knowing the name of the source database. For example: "backup.sh hot MAXS -mirror" will update the xmaxs snapmirror volume on the N10 filer. The backup.sh script first uses the volume's mount to determine the the source filer for the database and then it uses the uses the "snapmirror destinations" command to find the target filer. When a snapmirror update is done using the backup.sh script the event is logged with other backups and any error is emailed to recipients already configured in the backup.sh script. Also, reviewing the crontab file will make it easy to see all of the hosts snapmirror updates in relation to other backup.sh jobs.
|